7. Guarantee of Quality
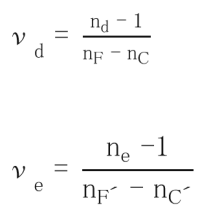
7.1 Refractive Index and Abbe
Refractive index and Abbe number values of our fine annealed products vary from catalog value by:
Refractive index (nd): +/-0.0003
Abbe number (vd): +/-0.5%
Upon request, we will supply blanks of optical glass to the following tolerances: Refractive index :
Refractive index (nd): +/-0.0002
Abbe number (vd): +/-0.3%
When special demand exists for specifications with other optical constants than the above, please consult us. We urge our customers to enjoy the cost savings and benefits of our close index control, melt to melt, over long periods of production. Usually this is done at no extra cost. We normally send certification (melt data) of refractive indices measured at the spectral lines: C, d, F, g and vd . On special request, we can supply refractive indices measured at other spectral lines . The following is the accuracy of standard measurements of refractive index and dispersion for raw glass and normal pressed blanks:
Refractive index = ±0.00003 Dispersion = ±0.00002
On request, we shall provide precision measurements of refractive index and dispersion:
Refractive index = ±0.00001 Dispersion = ±0.000003
We will report the environmental temperature, humidity and atmospheric pressure of the room where the precision measurement was undertaken. For, “ultra-precision measurements” and measurements at spectral lines not described in this catalog, please contact us.
7.2 Homogeneity
It is sometimes necessary to measure the index variation across a blank. In such cases, Ohara pays special attention to each process and can supply high homogeneity “Grade Special A” blanks. Grade Special A is our term for high homogeneity (Low Δn) optical glasses. Our Grade Special A glasses are available in the following homogeneity levels:
Table
| Classification | Homogeneity ( Δn) |
| Grade Special A1 | ±1X10⁻⁶ |
|
Grade Special A2 |
±2X10⁻⁶ |
|
Grade Special A5 |
±5X10⁻⁶ |
| Grade Special A20 | ±20X10-6 |
Please note that the Grade Special A number indicates n in the sixth decimal place. The anneal required must also be specified in terms of birefringence (nm/cm). Generally, low Δn also implies low birefringence from precision annealing. Using phase measuring interferometers, we measure transmitted wave front of each test piece. Interferograms can be supplied for high homogeneity blanks upon customer request.
7.3 Stress Birefringence
Depending on the annealing condition, optical glass retains slight residual strain in most cases. This can be observed as optical birefringence, measured by optical path differences and specified in nm/cm. Stress birefringence of a rectangular plate is measured at the middle of the long side where maximum values occur at a point 5% of the width from the edge. A disk is measured at 4 points located 5% from the edge of the diameter. The maximum value of the 4 points is shown as the Birefringence value. We guarantee the strain according to the grade of anneal as follows:
Table 2
| Class | 1 (Precision) | 2 (Fine) | 3 (Course) |
4 (Very Course) |
|
Birefringence (nm/cm) |
<5 | <10 | <20 | >20 |
Birefringence Measurement Chart (BMC) can be supplied upon customer request.
7.4 Striae
Striae are thread-like veins or cords which are visual indications of abruptly varying density. Striae can also be considered to be a lack of homogeneity caused by incomplete stirring of the molten glass. Some glasses contain components that evaporate during melting, causing layers of varying density, and therefore parallel striae appear. Striae in glass are detected by means of a striaescope, which consists of a point source of light and a collimating lens. Polished samples are examined at several different angles in the striaescope. They are then compared with the standards and graded. These established standard glasses are of a high order of quality and are certified to U.S. military specification MIL-G-174B.
Table 3
| Striae Grade |
Striae Grade Striae Content Using Striaescope |
|
A B C |
No visible striae Striae is light and scattered Striae is heavier than Grade B |
7.5 Bubbles
Bubble content is determined by taking a sample of glass from each melt. The total bubble cross-section per 100ml of glass volume is measured. Please refer to 6.1 . On request, we shall undertake bubble examination with the method and procedures of MIL-G-174B or the customer’s own specifications.
7.6 Coloring
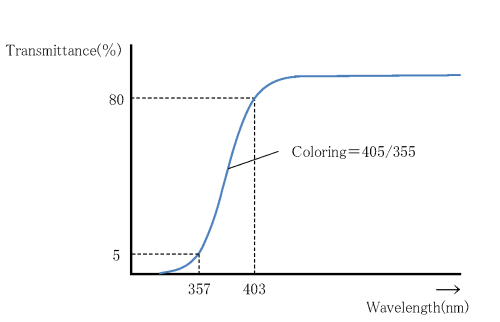
Variation of coloring between melts is generally within ±10 nm. On special request, we shall report the coloring or the transmission, including reflection losses, of the melt to be supplied by measuring spectral transmission.
7.7 Other
We showed each properties as representative value except for 7.1~7.6. Please contact us when you want to know the other value. In addition, please let us know your preferred specification when you place the orders.


